html模板注意事项
1.html模板查找顺序:
- Django 一开始会在根目录下的 templates 文件夹下查找,如果找不到就会在每个app文件夹里的 templates 文件夹下查找,如果再找不到就会报错,如果在查找的过程中两个app中的 templates 文件夹里都出现了相同名字的模板,那么就会按照 app 注册顺序(即: settings.py 中的app设置顺序)去获取
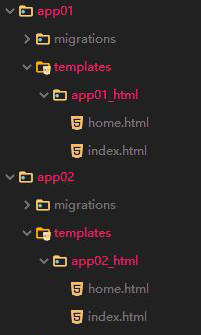
2. 解决 app 中的 templates 下重名的 html 模板的方法:
app01/
├── templates
├── app01_html
├── index.html
└── home.html
app02/
├── templates
├── app02_html
├── index.html
└── home.html
3.如果 templates 文件夹是创建在 app 目录下,那么就无需在 settings.py 中配置该路径(和在app中创建static文件夹一样)
4.如果数据库中的数据为 null,那么 Django 获取到的数据为 None,那么返回给 html 模板显示的数据也是为 None
URL路径加 / 和 不加 / 的区别
在HTML模板语言中url路径前面加 / 和不加 / 是有区别的
- 加 / -> url路径就是该路径
- src="/index/",那么url路径就会变成 127.0.0.1:8000/index/
- 不加 / -> 当前url路径拼接上没有加 / 的路径
- src="page01/" ,当前路径: 127.0.0.1:8000/index/,最终src的访问路径就会变成 127.0.0.1:8000/index/page01/
- src="?page=1&id=1" ,当前路径: 127.0.0.1:8000/index/,最终src的访问路径就会变成 127.0.0.1:8000/index/?page=1&id=1
常用语法
只需要记两种特殊符号:
- 变量相关的用: {{}}
- 逻辑相关的用:{%%}
- 注释相关的用:{##}
变量
在Django的模板语言中按此语法使用: {{ 变量名 }}
模板的解析过程: 当模版引擎遇到一个变量,它将计算这个变量,然后用结果替换掉它本身。变量的命名包括任何字母数字以及下划线 ("_")的组合。 变量名称中不能有空格或标点符号。
点(.)在模板语言中有特殊的含义。当模版系统遇到点("."),它将以这样的顺序查询:
- 字典查询(Dictionary lookup)
- 属性或方法查询(Attribute or method lookup)
- 数字索引查询(Numeric index lookup)
注意事项:
- 如果使用的变量不存在,模版系统将插入 string_if_invalid 选项的值,它被默认设置为 '' (空字符串)
- 如果变量是一个可调用函数,那么调用结果将成为模板的值,前提是该函数没有可传的参数
- 调用对象的不带参数的方法 或 不带参数的函数后面不要加括号(),因为在进行模板渲染的时候Django会自动帮你加上
# views.py
def view_fn(request):
lis = [1, 2, 3, 4]
dic = {
'name': 'Kevin',
'age': 18
}
lis_dic = [
{'width': 120, 'height': 75},
{'background': 'red', 'color': '#fff'}
]
def fn():
return 1 + 2
class Person():
def __init__(self, username, address):
self.username = username
self.address = address
def dream(self):
return '{}在做梦'.format(self.username)
kevin = Person('Kevin', '横沥')
aimer = Person('Aimer', '日本')
eric = Person('Eric', '东莞')
obj_lis = [kevin, aimer, eric]
return render(request, 'index.html', {
'lis': lis,
'dic': dic,
'lis_dic': lis_dic,
'fn': fn,
'user_obj': kevin,
'obj_lis': obj_lis
})
# index.html
<p>
{# 获取列表的第二个参数 -> 2 #}
{{ lis.1 }}
</p>
<p>
{# 获取字典中指定的key值 -> Kevin #}
{{ dic.name }}
</p>
<p>
{# 获取列表中第二个参数字典中指定的key值 -> #fff #}
{{ lis_dic.1.color }}
</p>
<p>
{# 调用不带参数的函数 -> 3 #}
{{ fn }}
</p>
<p>
{# 调用对象中的属性 -> Kevin #}
{{ user_obj.username }}
</p>
<p>
{# 调用对象中不带参数的方法 -> Kevin在做梦 #}
{{ user_obj.dream }}
</p>
<p>
{# 获取对象列表中的指定序列对象的属性 -> Aimer #}
{{ obj_lis.1.username }}
</p>
<p>
{# 调用对象列表中的指定序列对象的不带参数的方法 -> Aimer在做梦 #}
{{ obj_lis.1.dream }}
</p>
<p>
{# 直接输出字典 -> {'name': 'Kevin', 'age': 18} #}
{{ dic }}
{# 直接输出字典列表 -> [{'height': 75, 'width': 120}, {'color': '#fff', 'background': 'red'}] #}
{{ lis_dic }}
{# 直接输出对象 -> <app01.views.view_fn.<locals>.Person object at 0x000001B2849B8DD8> #}
{{ user_obj }}
{# 直接输出对象列表 -> [<app01.views.view_fn.<locals>.Person object at 0x000001B2849B8DD8>, <app01.views.view_fn.<locals>.Person object at 0x000001B2849B8D30>] #}
{{ obj_lis }}
</p>
request变量
- 因为request是全局变量,所以在任何模板语言中都可以直接使用request变量
<p>{{ request.method }}</p>
for循环
- 所循环的列表
# views.py
def view_fn(request):
lis = ['一', '二', '三', '四']
return render(request, 'index.html', {'lis': lis})
- 普通循环
# index.html
<ul>
{% for i in lis %}
<li>{{ i }}</li>
{% endfor %}
</ul>
# 效果
一
二
三
四
- for循环中的一些可用参数
| 变量 | 描述 |
forloop.counter | 获取当前循环的索引值(从1开始) |
forloop.counter0 | 获取当前循环的索引值(从0开始) |
forloop.revcounter | 获取当前循环的倒序索引值(从0开始) |
forloop.revcounter0 | 获取当前循环的倒序索引值(从1开始) |
forloop.first | 判断当前循环是不是第一次循环(布尔值) |
forloop.last | 判断当前循环是不是最后一次循环(布尔值) |
forloop.parentloop | 本层循环的外层循环 |
<ul>
{% for i in lis %}
<li>{{ i }} - {{ forloop.counter }} - {{ forloop.counter0 }} - {{ forloop.revcounter }} - {{ forloop.revcounter0 }} - {{ forloop.first }} - {{ forloop.last }}</li>
{% endfor %}
</ul>
# 效果
一 - 1 - 0 - 4 - 3 - True - False
二 - 2 - 1 - 3 - 2 - False - False
三 - 3 - 2 - 2 - 1 - False - False
四 - 4 - 3 - 1 - 0 - False - True
- forloop.parentloop -> 内层循环获取外层循环的相关信息
- forloop.parentloop 中的参数就是for循环的那些可用参数
# views.html
def view_fn(request):
nested_list = [
['张三1', '张三2', '张三3'],
['李四1', '李四2', '李四3']
]
return render(request, 'index.html', {'nested_list': nested_list})
# index.html
<ol>
{% for nested in nested_list %}
{% for n in nested %}
<dt>
外层循环的相关信息: {{ forloop.parentloop }} <br/>
外层循环当前的index: {{ forloop.parentloop.counter }} <br/>
外层循环当前的index -> index从0开始: {{ forloop.parentloop.counter0 }} <br/>
</dt>
<dd>内层循环的当前index: {{ forloop.counter }}</dd>
<dd>内层循环的当前index -> index从0开始: {{ forloop.counter0 }}</dd>
<dd>{{ n }}</dd>
<hr>
{% endfor %}
{% endfor %}
</ol>
# 效果
外层循环的相关信息: {'first': True, 'counter0': 0, 'revcounter': 2, 'counter': 1, 'revcounter0': 1, 'parentloop': {}, 'last': False}
外层循环当前的index: 1
外层循环当前的index -> index从0开始: 0
内层循环的当前index: 1
内层循环的当前index -> index从0开始: 0
张三1
外层循环的相关信息: {'first': True, 'counter0': 0, 'revcounter': 2, 'counter': 1, 'revcounter0': 1, 'parentloop': {}, 'last': False}
外层循环当前的index: 1
外层循环当前的index -> index从0开始: 0
内层循环的当前index: 2
内层循环的当前index -> index从0开始: 1
张三2
外层循环的相关信息: {'first': True, 'counter0': 0, 'revcounter': 2, 'counter': 1, 'revcounter0': 1, 'parentloop': {}, 'last': False}
外层循环当前的index: 1
外层循环当前的index -> index从0开始: 0
内层循环的当前index: 3
内层循环的当前index -> index从0开始: 2
张三3
外层循环的相关信息: {'first': False, 'counter0': 1, 'revcounter': 1, 'counter': 2, 'revcounter0': 0, 'parentloop': {}, 'last': True}
外层循环当前的index: 2
外层循环当前的index -> index从0开始: 1
内层循环的当前index: 1
内层循环的当前index -> index从0开始: 0
李四1
外层循环的相关信息: {'first': False, 'counter0': 1, 'revcounter': 1, 'counter': 2, 'revcounter0': 0, 'parentloop': {}, 'last': True}
外层循环当前的index: 2
外层循环当前的index -> index从0开始: 1
内层循环的当前index: 2
内层循环的当前index -> index从0开始: 1
李四2
外层循环的相关信息: {'first': False, 'counter0': 1, 'revcounter': 1, 'counter': 2, 'revcounter0': 0, 'parentloop': {}, 'last': True}
外层循环当前的index: 2
外层循环当前的index -> index从0开始: 1
内层循环的当前index: 3
内层循环的当前index -> index从0开始: 2
李四3
- for empty -> 当所循环的可迭代对象为空的时候就执行 empty 里面的内容
# views.py
def view_fn(request):
lis = []
return render(request, 'index.html', {'lis': lis})
# index.html
<ul>
{% for i in lis %}
<li>{{ i }}</li>
{% empty %}
<li>该可迭代对象是空的</li>
{% endfor %}
</ul>
if 条件判断
- if语句所支持的比较运算符: and 、or、==、>、<、!=、<=、>=、in、not in、is、is not
- if …… elif …… else
# views.py
def view_fn(request):
lis = [1, 2, 3]
return render(request, 'index.html', {'lis': lis})
# index.html
{% if lis|length > 5 %}
{{ lis.0 }}
{% elif lis|length == 3 %}
{{ lis.1 }}
{% else %}
{{ lis.2 }}
{% endif %}
- if …… in
- 例子一
# views.py
def view_fn(request):
lis = [1, 2, 3]
return render(request, 'index.html', {'lis': lis})
# index.html
{% if 1 in lis %}
{{ lis.0 }}
{% endif %}
- 例子二
# views.py
def view_fn(request):
class Person():
def __init__(self, username, address):
self.username = username
self.address = address
def dream(self):
return '{}在做梦'.format(self.username)
kevin = Person('Kevin', '横沥')
aimer = Person('Aimer', '日本')
eric = Person('Eric', '东莞')
obj_lis = [kevin, aimer, eric]
return render(request, 'index.html', {
'obj_lis': obj_lis,
'kevin': kevin
})
# index.html
{% if kevin in obj_lis %}
{{ kevin.username }}
{% endif %}
with
- 定义一个中间变量
- with 的作用: 给一个复杂的变量起别名
# views.py
def view_fn(request):
class Test():
def __init__(self):
self.employees = {'count': '100', 'age': 18}
business = Test()
return render(request, 'index.html', {'business': business})
# 写法一
# index.html
{% with new_name=business.employees.count %}
<p>{{ new_name }}</p>
<p>{{ new_name|length }}</p>
{% endwith %}
# 写法二
# index.html
{% with business.employees.count as new_name %}
<p>{{ new_name }}</p>
<p>{{ new_name|length }}</p>
{% endwith %}
Filters(过滤器)
- 过滤器的作用: 通过过滤器改变变量的显示(和Vue中的过滤器一样)
- 过滤器的语法: {{value|过滤器名称:参数}} -> 使用 '|' 应用过滤器
- 注意事项:
- 过滤器支持链式操作,即一个过滤器的输出作为另一个过滤器的输入 -> {{name|lower|length}}
- 过滤器可以接受参数,如: {{sss|truncatewords:30}} -> 显示 sss 变量内容中的前30个词
- 过滤器参数包含空格的话,必须用引号包裹起来。比如使用逗号和空格去连接一个列表中的元素,如:{{ list|join:
- '|'左右没有空格没有空格没有空格
- Django的模板语言中提供了大约六十个内置过滤器
1. 常用的过滤器
- upper
- 字母全大写
def view_fn(request):
value = 'abc'
return render(request, 'index.html', {'value': value})
{{ value|upper }}
- lower
- 字母全小写
def view_fn(request):
value = 'ABC'
return render(request, 'index.html', {'value': value})
{{ value|lower }}
- default
- 如果一个变量的值是false或者为空,那么就会使用给定的默认值。否则,使用变量的值
def view_fn(request):
value = ''
return render(request, 'index.html', {'value': value})
{{ value|default:"默认值" }}
- default_if_none
- 如果一个变量的值是 None,那么就会使用给定的默认值。否则,使用变量的值
def view_fn(request):
value = None
return render(request, 'index.html', {'value': value})
{{ value|default_if_none:"" }}
- length
- 返回值的长度,作用于字符串和列表
def view_fn(request):
value = [1, 2, 3]
return render(request, 'index.html', {'value': value})
{{ value|length }}
- first
- 获取列表的第一个值
def view_fn(request):
value = [1, 2, 3, 4]
return render(request, 'index.html', {'value': value})
{{ value|first }} # 1
- last
- 获取列表的最后一个值
def view_fn(request):
value = [1, 2, 3, 4]
return render(request, 'index.html', {'value': value})
{{ value|last }} # 4
- floatformat
- 浮点数格式 -> 保留x位小数
def view_fn(request):
value = 12.525
return render(request, 'index.html', {'value': value})
{{ value|floatformat:2 }} # 12.53
- filesizeformat
- 将值格式化为一个 “人类可读的” 文件尺寸 (例如 '13 KB', '4.1 MB', '102 bytes', 等等
def view_fn(request):
value = 10000000
return render(request, 'index.html', {'value': value})
{{ value|filesizeformat }}
- slice
- 切片
def view_fn(request):
value = [1, 2, 3, 4, 5, 6]
return render(request, 'index.html', {'value': value})
{{ value|slice:"2:-1" }}
- safe
- 作用一:
- 防止XSS攻击(通俗理解: 防止代码注入)
- 默认情况下 Django 会将变量内容是HTML标签和JS语法转换成字符串显示,这是出于安全考虑(和防止SQL注入一样),可以通过 safe 过滤器告诉Django这段代码是安全的不用装换成字符串
def view_fn(request):
value = '<a href="http://www.baidu.com">百度</a>'
return render(request, 'index.html', {'value': value})
{{ value|safe }}
- 作用二:
- 将数字转换为字符串
{% if '1' == 1|safe %}
<p>标题</p>
{% endif %}
- truncatechars
- 如果字符串字符多于指定的字符数量,那么会被截断。截断的字符串将以可翻译的省略号序列("...")结尾 -> 通俗理解: 将超出指定长度的内容变成省略号('……')
def view_fn(request):
value = 'The two-way tunnel is over 5.7 km long'
return render(request, 'index.html', {'value': value})
{{ value|truncatechars:9 }}
- truncatewords
- 将字符串按照单词进行截取,超出指定长度的内容变成省略号('……') -> truncatewords 只作用于英文,中文会无效
def view_fn(request):
value = 'The two-way tunnel is over 5.7 km long'
return render(request, 'index.html', {'value': value})
{{ value|truncatewords:5 }}
- cut
- 删除变量内容中指定的字符串
def view_fn(request):
value = 'You are not a Englishman'
return render(request, 'index.html', {'value': value})
{{ value|cut:"not" }}
- join
- 使用指定字符串将列表中的内容拼接成字符串
def view_fn(request):
value = ['abc', '45']
return render(request, 'index.html', {'value': value})
{{ value|join:"_" }}
- 使用指定字符串将字符串的内容重新拼接
def view_fn(request):
value = 'Kevin'
return render(request, 'index.html', {'value': value})
{{ value|join:"_" }}
- random
- 随机返回列表中的一个值
def view_fn(request):
value = [1, 2, 3, 4]
return render(request, 'index.html', {'value': value})
{{ value|random }}
- make_list
- 将字符串转换成列表
def view_fn(request):
value = 'Kevin'
return render(request, 'index.html', {'value': value})
{{ value|make_list }} # ['K', 'e', 'v', 'i', 'n']
- dictsort
- 如果value的值是一个字典,那么返回值是按照关键字排序的结果
- 数据结构一
def view_fn(request):
value = [
{'name': 'Kevin', 'age': 20},
{'name': 'Zone', 'age': 19},
{'name': 'Timmy', 'age': 30}
]
return render(request, 'index.html', {'value': value})
{{ value|dictsort:"age" }} # 显示结果: [{'age': 19, 'name': 'Zone'}, {'age': 20, 'name': 'Kevin'}, {'age': 30, 'name': 'Timmy'}]
- 数据结构二
def view_fn(request):
value = [
{'a': {'b': {'c': "x"'+'}'+'}'}}},
{'a': {'b': {'c': "a"'+'}'+'}'}}},
{'a': {'b': {'c': "c"'+'}'+'}'}}},
{'a': {'b': {'c': "b"'+'}'+'}'}}},
]
return render(request, 'index.html', {'value': value})
{{ value|dictsort:"a.b.c" }} # 显示结果: [{'a': {'b': {'c': 'a''+'}'+'}'}}}, {'a': {'b': {'c': 'b''+'}'+'}'}}}, {'a': {'b': {'c': 'c''+'}'+'}'}}}, {'a': {'b': {'c': 'x''+'}'+'}'}}}]
- 数据结构三
def view_fn(request):
value = [
{'key': "X"},
{'key': "a"},
{'key': "c"},
{'key': "B"},
]
return render(request, 'index.html', {'value': value})
{{ value|dictsort:"key.lower" }} # 显示结果: [{'key': 'a'}, {'key': 'B'}, {'key': 'c'}, {'key': 'X'}]
- wordcount
- 返回单词的个数
def view_fn(request):
value = 'Hello World'
return render(request, 'index.html', {'value': value})
{{ value|wordcount }} # 2
- timesince
- 计算开始时间到结束时间之间的时间差(显示如: 4 years, 8 months)
- {{开始时间对象|timesince:结束时间对象}} -> 如果timesince不穿时间对象默认使用当前时间
import datetime
def view_fn(request):
past_time = datetime.datetime(2014, 8, 15, 9, 54, 10)
later_time = datetime.datetime(2020, 1, 1, 10, 0, 0)
return render(request, 'index.html', {'past_time': past_time, 'later_time': later_time})
{{ past_time|timesince}} # 4 years, 8 months
{{ past_time|timesince:now_time }} # 5 years, 4 months
- timeuntil
- 和 timesince 过滤器是一样的就是所传的时间对象位置改变了
- {{结束时间对象|timeuntil:开始时间对象}} -> 如果timeuntil不穿时间对象默认使用当前时间
import datetime
def view_fn(request):
past_time = datetime.datetime(2014, 8, 15, 9, 54, 10)
later_time = datetime.datetime(2020, 1, 1, 10, 0, 0)
return render(request, 'index.html', {'past_time': past_time, 'later_time': later_time})
{{ later_time|timeuntil }} # 8 months, 1 week
{{ later_time|timeuntil:past_time }} # 5 years, 4 months
- date
- 对日期对象进行格式化
import datetime
def view_fn(request):
now_time = datetime.datetime.now()
return render(request, 'index.html', {'now_time': now_time})
{{ now_time|date:"Y-m-d H:i:s" }}
- 可用参数的描述
| 格式化字符 | 描述 | 显示输出 |
a | 'a.m.'或'p.m.'(请注意,这与PHP的输出略有不同,因为这包括符合Associated Press风格的期间) | a.m. p.m. |
A | 'AM' 或 'PM' | AM PM |
b | 月份,英文简写的月份 | apr |
c | ISO 8601格式。 (注意:与其他格式化程序不同,例如"Z","O"或"r",如果值为naive datetime,则"c"格式化程序不会添加时区偏移量,请参阅datetime.tzinfo) | 2008-01-02T10:30:00.000123+02:00 2008-01-02T10:30:00.000123 |
d | 日,带前导零的2位数字 | 01 或 31 |
D | 星期几,英文简写的星期 | Sat |
e | 时区名称 可能是任何格式,或者可能返回一个空字符串,具体取决于datetime | ''、'GMT'、'-500'、'US/Eastern'等 |
| E | 月份,特定地区的替代表示通常用于长日期表示 | 'listopada'(对于波兰语区域,而不是'Listopad') |
f | 时间,在12小时的小时和分钟内,如果它们为零,则分钟停留。 专有扩展。 | 1 1:30 |
F | 月,以大写开头的完整英文月份单词 | April |
g | 小时,12小时格式,无前导零。 | 1 ~ 12 |
G | 小时,24小时格式,无前导零。 | 0 ~ 23 |
h | 小时,12小时格式。 | 01 ~ 12 |
H | 小时,24小时格式。 | 00 ~ 23 |
i | 分钟。 | 00 ~ 59 |
I | 夏令时间,无论是否生效。 | 1 ~ 0 |
j | 没有前导零的月份的日子。 | 1 ~ 31 |
l | 星期几,完整的英文星期单词 | Saturday |
L | 布尔值是否是一个闰年。 | True False |
m | 月,2位数字带前导零。 | 01 ~ 12 |
M | 月,以大写开头的英文简写的月份 | Apr |
n | 月无前导零。 | 1 ~ 12 |
N | 美联社风格的月份缩写。 专有扩展。 | 'Jan.','Feb.','March','May' |
o | ISO-8601周编号,对应于使用闰年的ISO-8601周数(W)。 对于更常见的年份格式,请参见Y。 | 1999 |
O | 与格林威治时间的差异在几小时内。 | +0200 |
P | 时间为12小时,分钟和'a.m。'/'p.m。',如果为零,分钟停留,特殊情况下的字符串“午夜”和“中午”。 专有扩展。 | '1 am','1:30 pm' / t3>,'midnight','noon','12:30 pm'/ T10> |
r | Thu, 21 Dec 2000 16:01:07 +0200 | |
s | 秒,带前导零的2位数字。 | 00 ~ 59 |
S | 一个月的英文序数后缀,2个字符。 | st,nd,rd 或 th |
t | 给定月份的天数。 | 28 to 31 |
T | 本机的时区。 | EST MDT |
u | 微秒。 | 000000 to 999999 |
U | 自Unix Epoch以来的二分之一(1970年1月1日00:00:00 UTC)。 | |
w | 星期几,数字无前导零。 | '0'(星期日) ~ '6'(星期六) |
W | ISO-8601周数,周数从星期一开始。 | 1,53 |
y | 年份,2位数字。 | 99 |
Y | 年,4位数。 | 1999 |
z | 一年中的日子 | 0 ~ 365 |
Z | 时区偏移量,单位为秒。 UTC以西时区的偏移量总是为负数,对于UTC以东时,它们总是为正。 | -43200 ~ 43200 |
2. 自定义过滤器
- 注意: 过滤器最多只能接收两个参数
- 自定义过滤器只是带有一个或两个参数的Python函数
- 变量(输入的值,即: 上面例子中的value)
- 参数: 这可以有一个默认值,或完全省略
- 自定义过滤器代码文件的存放位置
app01/
├── templatetags # 在 app01 的目录下创建一个 Python Package(包)
├── __init__.py
├── app01_filters.py # 自定义过滤器的文件
└── …….py
- 编写自定义过滤器
# 固定写法
from django import template
register = template.Library() # 生成一个注册用的实例
@register.filter(name='过滤器名称') # 使用装饰器把自定义的函数注册到模板语言中
def 函数名(value, arg):
# value -> 模板中的变量
# arg -> 所传过来的参数
return xxx # 将处理好的值进行返回
# app01_filters.py
from django import template
register = template.Library()
@register.filter(name='add_str')
def add_str2(value):
return '{}_字符串'.format(value)
@register.filter(name='num_sum')
def num_sum(value, arg):
return value + arg
- 使用自定义过滤器
# 固定写法
{# 先导入我们自定义filter那个文件 -> 一个模板只需要导入一次 #}
{% load 自定义过滤器的文件名 %}
{{# 使用自定义的过滤器 #}}
{{'{'+'{'+' 变量|自定义过滤器:参数 '+'}'+'}'}}
# views.py
def view_fn(request):
value1 = '中文'
value2 = 10
return render(request, 'index.html', {
'value1': value1,
'value2': value2
})
# index.html
{% load app01_filters %}
{{ value1|add_str }} # 等于调用了 add_str 方法 -> add_str(value1)
{{ value2|num_sum:10 }} # 等于调用了 num_sum 方法 -> add_str(value2, 10)
母板
- 将多个页面都相同的部分抽出取来定义成母板,然后子页面通过代码替换模板中预先定义好带名字的块
- 我们通常会在母板中定义页面专用的CSS块和JS块,方便子页面使用自身独有的css和js
# 在母版中定义块的固定写法
{% block 块的名字 %}
{% endblock %}
<!DOCTYPE html>
<html>
<head>
<meta charset="utf-8">
<meta http-equiv="X-UA-Compatible" content="IE=edge,chrome=1">
<title>Title</title>
<meta name="description" content="">
<meta name="keywords" content="">
<link rel="stylesheet" href="">
{# 定义被子页面所替换的js块,方便子页面使用自身独有的css #}
{% block page-css %}
{% endblock %}
</head>
<body>
<h1>这是母版的标题</h1>
{# 定义被子页面所替换的块 #}
{% block page-main %}
{% endblock %}
{# 定义被子页面所替换的js块,方便子页面使用自身独有的js #}
{% block page-js %}
{% endblock %}
<script type="text/javascript"></script>
</body>
</html>
继承母板
- 在子页面中最上方使用下面的语法来继承母板
# {% extends '母版路径' %} -> 母版路径默认就是在templates下,所以templates可以省略不写
{% extends 'master/m_index.html' %}
块(block)
- 在子页面中替换母版定义好的块
# 固定写法
{% block 母版中所定义块的名字 %}
html内容
{% endblock %}
# 子页面.html
{# 继承母版 #}
{% extends 'master/m_index.html' %}
{# 替换母版中所定义好的块 #}
{% block page-main %}
<div>这是HTML的内容</div>
<ul>
<li>内容一</li>
<li>内容二</li>
<li>内容三</li>
</ul>
{% endblock %}
组件
- 可以将常用的页面内容如导航条,页尾信息等组件保存在单独的html文件中,然后在需要的页面中按如下语法导入即可
# {% include '组件路径' %} -> 组件路径默认就是在templates下,所以templates可以省略不写
# xxx.html
{% include 'component/nav.html' %}
静态文件相关
- 之前我们导入静态文件的时候需要在静态文件路径的前面加上在配置文件定义好的变量名,但是如果变量名修改了所有的路径也要修改一遍,我们可以使用模板语言代替之前所使用的导入静态文件路径的方法
- 静态文件的查询顺序
- 配置文件中没有设置 STATICFILES_DIRS 配置项
- 按照 app 的注册顺序进行查找,如果所有的 app 中都没有,就结束查找,不会自行在项目项目根目录下进行查找
- 配置文件中设置了 STATICFILES_DIRS 配置项
- 按照 STATICFILES_DIRS 配置项所配置的路径进行查找,如果没有,不会自行在app下或项目根目录下进行查找
1.STATIC_URL = /static/ -> /static/
- 缺点: 当配置文件中的 STATIC_URL 参数内容被修改了,那么所有的静态文件路径都需要被修改
<link rel="stylesheet" href="/static/css/home.css">
<script src="/static/js/home.js"></script>
2. {% static %}
- 优点: 当配置文件中的 STATIC_URL 参数内容被修改了,也不会影响到静态文件的路径
- 注意: 一个模板中{% load static %} 只需要导入一次就可以了,这里是为了演示才每一次都导入
- 固定写法
# 固定写法 -> 这里使用了 link 标签来举例
{% load static %}
<link rel="stylesheet" href="{% static '路径' %}">
- 引入css或js文件时使用
{% load static %}
<link rel="stylesheet" href="{% static 'css/public.css' %}">
<script src="{% static 'js/public.js' %}"></script>
- 图片路径
{% load static %}
<img src="{% static 'img/Husky.jpg' %}" alt="">
- 某个文件多处被用到可以存为一个变量
- as 的用法和MySQL中的一样,起别名
{% load static %}
{% static 'img/Husky.jpg' as myimg %}
<img src="{{ myimg }}" alt="">
<img src="{{ myimg }}" alt="">
3.{% get_static_prefix %}
- 优点: 当配置文件中的 STATIC_URL 参数内容被修改了,也不会影响到静态文件的路径
- 注意: 一个模板中{% load static %} 只需要导入一次就可以了,这里是为了演示才每一次都导入
# 固定写法 -> 这里使用了 link 标签来举例
{% load static %}
<link rel="stylesheet" href="{% get_static_prefix %}路径">
- 引入css或js文件时使用
{% load static %}
<link rel="stylesheet" href="{% get_static_prefix %}css/public.css">
<script src="{% get_static_prefix %}js/public.js"></script>
- 图片路径
{% load static %}
<img src="{% get_static_prefix %}img/Husky.jpg" alt="">
- {% get_static_prefix %} 的写法二
- as 的用法和MySQL中的一样,起别名
# 固定写法
{% load static %}
{% get_static_prefix as 别名 %}
<img src="{{'{'+'{'+' 别名 '+'}'+'}'}}路径" alt="">
{% load static %}
{% get_static_prefix as STATIC_PREFIX %}
<img src="{{ STATIC_PREFIX }}img/Husky.jpg" alt="">
simple_tag
- 注意: 当创建并使用了 simple_tag 后,只有重启项目后才会生效,否则就会报错
- simple_tag和自定义filter类似,只不过可以接受更多的参数
- 定义simple_tag的代码存放位置和自定义filter的代码存放位置是一样
app01/
├── templatetags # 在 app01 的目录下创建一个 Python Package(包)
├── __init__.py
├── app01_simple_tag.py # simple_tag 的文件
└── …….py
- 定义注册 simple_tag
# 固定写法
from django import template
register = template.Library() # 生成一个注册用的实例
@register.simple_tag(name='simple_tag名称') # 使用装饰器把自定义的函数注册到模板语言中
def 函数名(arg1, arg2, arg3, ……):
# arg -> 所传过来的参数
return xxx # 将处理好的值进行返回
# app01_simple_tag.py
from django import template
register = template.Library()
@register.simple_tag(name='plus')
def plus(a, b, c):
return '{} + {} + {}'.format(a, b, c)
- 调用 simple_tag
# 固定写法
{# 先导入我们存放定义 simple_tag 的那个文件 -> 一个模板只需要导入一次 #}
{% load 存放定义simple_tag的文件名 %}
{{# 使用 simple_tag #}}
{% simple_tag的名字 参数一 参数二 参数三 %}
# xxx.html
{% load app01_simple_tag %}
{% plus '1' '2' 'abc' %} # 等于调用了 plus 方法 -> plus('1', '2', 'abc')
inclusion_tag
- 注意: 当创建并使用了 inclusion_tag 后,只有重启项目后才会生效,否则就会报错
- inclusion_tag 和 simple_tag 很类似,不同之处在于 inclusion_tag 会将处理好的 HTML 代码进行返回
- inclusion_tag 就相当于一个局部的模板渲染,最后返回一段HTML代码
- 定义 inclusion_tag 的代码存放位置和自定义filter的代码存放位置是一样
app01/
├── templatetags # 在 app01 的目录下创建一个 Python Package(包)
├── __init__.py
├── app01_inclusion_tag.py # inclusion_tag 的文件
└── …….py
- 定义注册 inclusion_tag
# 固定写法
from django import template
register = template.Library() # 生成一个注册用的实例
# 使用装饰器把自定义的函数注册到模板语言中
@register.inclusion_tag('html路径') # inclusion_tag 会直接从 templates 目录下开始查找,所以templates可以省略不写
def 函数名(arg1, arg2, arg3, ……):
# arg -> 所传过来的参数
return xxx # 将处理好的值返回给 inclusion_tag 所调用的 HTML
# app01_inclusion_tag.py
from django import template
register = template.Library()
@register.inclusion_tag('inclusion_tag_pages/i_t_page.html') # inclusion_tag 会直接从 templates 目录下开始查找,所以templates可以省略不写
def show_results(n):
if n < 1:
n = 1
else:
int(n)
data = ["第{}项".format(i) for i in range(1, n + 1)]
return {"data": data} # 将处理好的值返回给 inclusion_tag 所调用的 HTML
- inclusion_tag 所调用的HTML代码
# templates/inclusion_tag_pages/i_t_page.html
<ul>
{% for i in data %}
<li>{{ i }}</li>
{% endfor %}
</ul>
- 调用 inclusion_tag
# 固定写法
{# 先导入我们存放定义 inclusion_tag 的那个文件 -> 一个模板只需要导入一次 #}
{% load 存放定义inclusion_tag的文件名 %}
{{# 使用 inclusion_tag #}}
{% inclusion_tag的名字 参数一 参数二 参数三 %}
# xxx.html
{% load app01_inclusion_tag %}
{% show_results 10 %}
在模板中对url使用反向解析
# url使用了分组匹配,那么就使用位置参数
# url使用了分组命名匹配,那么就使用关键字参数
# 没有使用 include
{% url 'url名称' %}
{% url 'url名称' 位置参数1 位置参数2 %}
{% url 'url名称' 关键字参数1 关键字参数2 %}
# 使用了 include
{% url '命名空间的名字:url名称' %}
{% url '命名空间的名字:url名称' 位置参数1 位置参数2 %}
{% url '命名空间的名字:url名称' 关键字参数1 关键字参数2 %}
# 没有使用 include
{% url 'index' %}
{% url 'show_news' 1 2 %}
{% url 'show_news2' category=1 pageNo=2 %}
# 使用了 include
{% url 'app01:index' %}
{% url 'app01:show_news' 1 2 %}
{% url 'app01:show_news2' category=1 pageNo=2 %}
其他
- pk -> 获取该条数据的主键值(即: id)
{{obj.pk}}
- .get_设置了choices参数的字段名_dispaly -> 获取 choices 参数中 索引为1 的值
# models.py
class ChoicesTable(models.Model):
education_choices = (
(1, '重点大学'),
(2, '普通本科'),
(3, '独立院校'),
(4, '民办本科'),
(5, '大专'),
(6, '民办专科'),
(7, '高中'),
(8, '其他')
)
education = models.IntegerField(verbose_name='学历', choices=education_choices, default=1)
record_choices = (
('checked', "已签到"),
('vacate', "请假"),
('late', "迟到"),
('noshow', "缺勤"),
('leave_early', "早退"),
)
record = models.CharField(verbose_name="上课纪录", choices=record_choices, default="checked", max_length=64)
{{'{'+'{'+'obj.get_education_display'+'}'+'}'}}
{{'{'+'{'+'obj.get_record_display'+'}'+'}'}}