基本的视图函数
- 基本格式
from django.shortcuts import HttpResponse, render, redirect
def 视图函数名称(request):
# 所有跟请求相关的数据,Django都帮你封装到 request 里面了
return render(request, 'html路径')
from django.shortcuts import HttpResponse, render, redirect
def view_fn(request):
# 所有跟请求相关的数据,Django都帮你封装到 request 里面了
return render(request, 'index.html')
CBV 和 FBV
1. CBV -> class base views
- CBV的本质还是FBV
- 基于类编写的视图
# CBV版的添加班级
from django.views import View
class AddClass(View):
# get的请求所执行的代码
def get(self, request):
return render(request, "add_class.html")
# post的请求所执行的代码,在post的请求中也是可以获取get请求参数 -> request.GET.get('xxx')
def post(self, request):
class_name = request.POST.get("class_name")
models.Classes.objects.create(name=class_name)
return redirect("/class_list/")
- CBV接收url的参数
# urls.py
from django.conf.urls import url
from django.contrib import admin
from app01 import views
urlpatterns = [
url(r'^index/(\d+)/', views.AddClass.as_view())
]
class AddClass(View):
def get(self, request, id):
print(id)
return HttpResponse('get')
def post(self, request, id):
print(id)
return HttpResponse('post')
- dispatch方法
- dispatch方法其实是CBV源码中用于根据不同的请求方式调用不同的方法(即: 如果是GET请求,那么就会执行你所创建的CBV中的处理get请求的方法)
- 在执行CBV中处理请求的方法(即: 你所创建的CBV中的处理get/post请求的方法)之前都会先执行一次 dispatch 方法,因为dispatch方法的作用就是根据不同的请求方式调用不同的方法(即: 如果是GET请求,那么就会执行你所创建的CBV中的处理get请求的方法)
- 注意: 如果在CBV中使用dispatch方法,那么一定要返回调用父类View中的dispatch方法的返回值,除非自己实现请求方法的分发功能(即: 如果是GET请求,那么就会执行你所创建的CBV中的处理get请求的方法)
- 使用场景:
- CBV处理请求的方法(即: 你所创建的CBV中的处理get/post请求的方法)中出现相同的操作时,可以将该相同的操作放到 dispatch 方法中执行
from django.views import View
class AddClass(View):
def dispatch(self, request, *args, **kwargs):
print('执行 get方法 和 post方法 都有的操作')
return super(AddClass, self).dispatch(request, *args, **kwargs) # 调用父类View的dispatch方法,根据不同的请求方式调用不同方法(即: 如果是GET请求,那么就会执行下方get方法)
# 一定要返回调用父类View中的dispatch方法的返回值
def get(self, request):
return HttpResponse('get')
def post(self, request):
return HttpResponse('post')
- 自己实现请求方法的分发功能(即: 如果是GET请求,那么就会执行你所创建的CBV中的处理get请求的方法),类似于中间件的功能
from django.views import View
class AddClass(View):
def dispatch(self, request, *args, **kwargs):
if request.method == 'GET':
return self.get(request)
else:
return self.post(request)
def get(self, request):
return HttpResponse('get')
def post(self, request):
return HttpResponse('post')
- 注意: 使用CBV时,需要对urls.py做出相应的修改
# urls.py
url(r'^add_class/$', AddClass.as_view())
2.FBV -> function base views
- 基于函数编写的视图
# FBV版的添加班级
def add_class(request):
if request.method == "POST":
class_name = request.POST.get("class_name")
models.Classes.objects.create(name=class_name)
return redirect("/class_list/")
return render(request, "add_class.html")
给视图添加装饰器
1.使用装饰器装饰FBV
- FBV本身就是一个函数,所以和给普通的函数加装饰器无差
# 计算执行时间的装饰器
def wrapper(func):
def inner(*args, **kwargs):
start_time = time.time()
ret = func(*args, **kwargs)
end_time = time.time()
print("used:", end_time-start_time)
return ret
return inner
# FBV版添加班级@wrapper
def add_class(request):
if request.method == "POST":
class_name = request.POST.get("class_name")
models.Classes.objects.create(name=class_name)
return redirect("/class_list/")
return render(request, "add_class.html")
2.使用装饰器装饰CBV
- 类中的方法与独立函数不完全相同,因此不能直接将函数装饰器应用于类中的方法 ,我们需要先将其转换为方法装饰器
- Django中提供了method_decorator装饰器用于将函数装饰器转换为方法装饰器
- 使用装饰器装饰类中的方法
# CBV版添加班级
from django.views import View
from django.utils.decorators import method_decorator
# 计算执行时间的装饰器
def wrapper(func):
def inner(*args, **kwargs):
start_time = time.time()
ret = func(*args, **kwargs)
end_time = time.time()
print("used:", end_time-start_time)
return ret
return inner
class AddClass(View):
@method_decorator(wrapper) # 使用method_decorator装饰器用于将函数装饰器转换为方法装饰器
def get(self, request):
return render(request, "add_class.html")
def post(self, request):
class_name = request.POST.get("class_name")
models.Classes.objects.create(name=class_name)
return redirect("/class_list/")
- 使用装饰器直接装饰类
- 通过name指定要装饰的方法,且name参数必传
# CBV版添加班级
from django.views import View
from django.utils.decorators import method_decorator
# 计算执行时间的装饰器
def wrapper(func):
def inner(*args, **kwargs):
start_time = time.time()
ret = func(*args, **kwargs)
end_time = time.time()
print("used:", end_time - start_time)
return ret
return inner
# 使用装饰器直接装饰类,且name参数必传
@method_decorator(wrapper, name='get') # name 是指定装饰get请求方法,还是post请求方法
@method_decorator(wrapper, name='post') # 同时装饰get和post方法
class AddClass(View):
def get(self, request):
return render(request, "add_class.html")
def post(self, request):
class_name = request.POST.get("class_name")
models.Classes.objects.create(name=class_name)
return redirect("/class_list/")
- 在dispatch方法添加装饰器
- 在执行get方法和post方法之前先会执行dispatch方法,因为dispatch方法是分配执行get方法还是post方法,所以在dispatch方法上添加了装饰器等同于同时给get方法和post方法都添加上了装饰器
# CBV版添加班级
from django.views import View
from django.utils.decorators import method_decorator
# 计算执行时间的装饰器
def wrapper(func):
def inner(*args, **kwargs):
start_time = time.time()
ret = func(*args, **kwargs)
end_time = time.time()
print("used:", end_time - start_time)
return ret
return inner
class AddClass(View):
@method_decorator(wrapper) # 在dispatch方法上添加装饰器
def dispatch(self, request, *args, **kwargs):
return super(AddClass, self).dispatch(request, *args, **kwargs)
def get(self, request):
return render(request, "add_class.html")
def post(self, request):
class_name = request.POST.get("class_name")
models.Classes.objects.create(name=class_name)
return redirect("/class_list/")
Response对象
- render、HttpResponse、redirect、JsonResponse 方法都会返回一个Response对象
- Response对象中的属性
- .content: 响应内容
- .charset: 响应内容的编码
- .status_code: 响应的状态码
def view_fn(request):
res_obj = render(request, 'test.html')
print(res_obj.content) # 响应的内容 -> bytes类型的html代码
print(res_obj.charset) # 响应内容的编码 -> utf-8
print(res_obj.status_code) # 响应的状态码 -> 200
return res_obj
JsonResponse对象
- JsonResponse 和 HttpResponse 的区别:
- 响应头的区别,通过 JsonResponse 将数据发送给浏览器,就算Ajax不设置 date_type='json',接收到的也会是一个对象,因为响应头向浏览器说明了这是一个json数据,所以ajax会自动将他转换为对象
- JsonResponse 默认只能接受字典类型,如果想接受列表类型的参数,那么就要修改safe关键字参数,下面有提到
- JsonResponse 的作用生成一个Json格式的字符串,而不需要使用 json 模块去生成Json格式的字符串,直接使用 JsonResponse 就可以了
from django.http import JsonResponse
def view_fn(request):
dic = {'name': 'Kevin', 'age': 18}
res_obj = JsonResponse(dic)
print(res_obj.content) # b'{"name": "Kevin", "age": 18}'
return res_obj
- 如果要生成一个Json格式的列表,就需要修改safe关键字参数(且safe关键字参数默认等于 True),因为JsonResponse默认只能传递字典类型
from django.http import JsonResponse
def view_fn(request):
dic = [1, 2, 3, 4]
res_obj = JsonResponse(dic, safe=False)
print(res_obj.content) # b'[1, 2, 3, 4]'
return res_obj
视图函数基础三件套
- 所有跟请求相关的数据,Django都帮你封装到 request 里面了
1.HttpResponse
- 传入一个字符串参数,将该字符串发送给浏览器
from django.shortcuts import HttpResponse
def views_fn(request):
# 所有跟请求相关的数据,Django都帮你封装到 request 里面了
# 业务逻辑代码
return HttpResponse('文字')
- 使用 HttpResponse 实现简单的 render 的功能
def views_fn(request):
print(sys.path)
with open('templates/login.html', 'r', encoding='utf-8') as f:
data = f.read()
return HttpResponse(data)
- django.http 中的 HttpResponse 和 django.shortcuts 中的 HttpResponse 是一样的
from django.http import HttpResponse
# 等同于
from django.shortcuts import HttpResponse
- status 参数
- 默认情况下数据返回成功后状态码为200,可以通过 status 参数修改数据返回成功后的状态码
from django.shortcuts import HttpResponse
import json
def index(request):
return HttpResponse(json.dumps({'msg': 'hello'}), status=400)
2.render
- 将指定的HTML文件内容发送给浏览器
- render 是在 django.http 中的 HttpResponse 基础上封装的
- render方法所接收的参数(常用的就只有前三个):

- requset: 用于生成响应的请求对象
- template_name: 待渲染的HTML模板文件名称
- context: 保存具体数据的字典,用于将字典中的数据填充到HTML模板文件中(类似于我们自己写的Web框架中所用到的 jinja2)
- content_type: 生成的文档要使用的MIME类型。默认为 DEFAULT_CONTENT_TYPE 设置的值。默认为'text/html'
- status: 响应的状态码。默认为200
- useing: 用于加载模板的模板引擎的名称
from django.shortcuts import render
def views_fn(request):
# 所有跟请求相关的数据,Django都帮你封装到 request 里面了
# 业务逻辑代码
return render(request, "index.html", {"name": "Alex", "hobby_list": ["烫头", "泡吧"]})
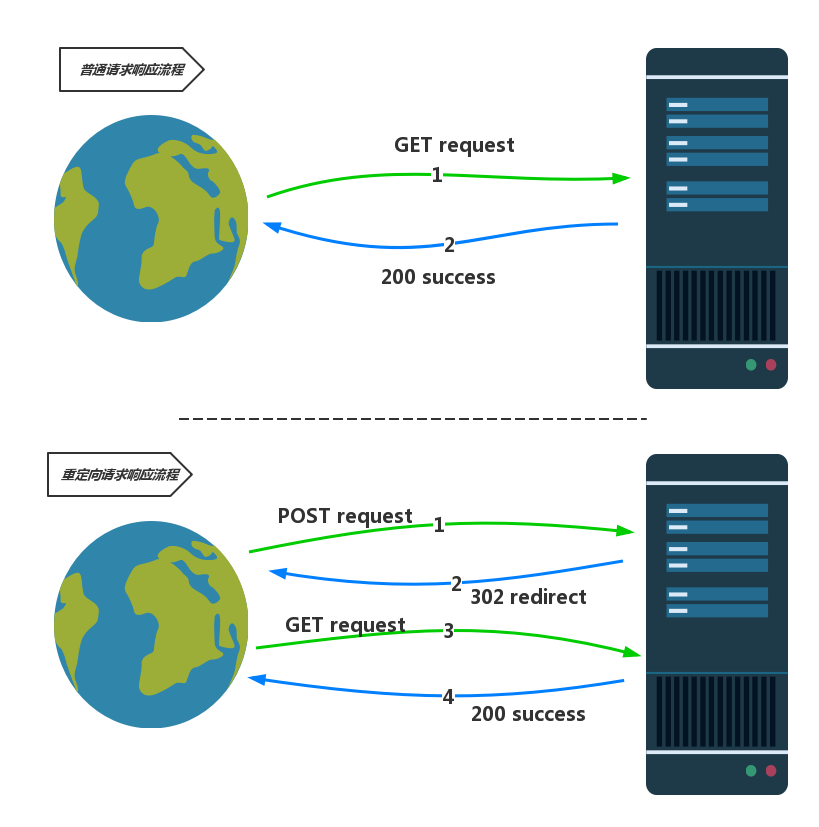
3.redirect
- 网页重定向
- 接收一个 URL 参数, 表示让浏览器跳转到指定的 URL(网址)
from django.shortcuts import redirect
def views_fn(request):
# 所有跟请求相关的数据,Django都帮你封装到 request 里面了
# 业务逻辑代码
return redirect("/login")
# return redirect("http://www.baidu.com")
- 网址重定向的本质: 我要重定向到百度,首先浏览器访问了127.0.0.1:8080/login网址,然后网页服务器接收到消息进行处理后发送消息告诉浏览器叫浏览器请求百度的服务器,然后浏览器再发送消息给百度的服务器请求百度的页面
获取请求的数据
1. request.path_info -> 获取用户访问的url,不包括域名和参数
- request.path_info
def view_fn(request):
print(request.path_info) # /view_fn
return HttpResponse('view_fn页面')
2. request.get_full_path() -> 获取用户访问的url,不包括域名,但是包括参数
- request.get_full_path()
def view_fn(request):
print(request.get_full_path()) # /view_fn?a=123
return HttpResponse('view_fn页面')
3. request.method -> 获取使用了什么请求方式
- request.method
- 注意:所有的请求方式都必须大写
- 获取使用了什么请求方式 -> 一般用于判断是使用了 GET请求 还是使用了 POST请求
def views_fn(request):
print(request.method) # GET / POST
return HttpResponse('文字')
- 注意: 如果要判断使用什么方式进行请求,首先判断 POST 请求
def views_fn(request):
if request.method == 'POST':
return HttpResponse('文字')
else:
return render(request, 'login.html')
4. request.is_ajax() -> 判断是否是ajax请求
- request.is_ajax()
- 无论是GET或POST的ajax请求,返回的都是 True,只要是ajax请求返回的都是 True
def views_fn(request):
if request.is_ajax():
return HttpResponse('文字')
else:
return render(request, 'login.html')
5. request.META -> 获取请求头中的信息
def views_fn(request):
print(request.META) # 获取请求头的所有信息
print(request.META.get('CONTENT_TYPE')) # 获取请求类型 -> content_type: application/x-www-form-urlencoded
print(request.META.get('REMOTE_ADDR')) # 获取当前的网址 -> 127.0.0.1
print(request.META.get('HTTP_HOST')) # 获取请求的网址+端口号 -> 127.0.0.1:8000
print(request.META.get('SERVER_PORT')) # 获取请求的端口号 -> 8000
print(request.META.get('HTTP_USER_AGENT')) # 获取请求当前网址的设备信息 -> 'Mozilla/5.0 (Windows NT 10.0; Win64; x64) ……'
# 'Mozilla/5.0 (iPhone; CPU iPhone OS 11_0 like Mac OS X) ……'
return HttpResponse('获取请求头的参数')
6. request.body -> 获取请求的元数据
- 元数据: 前端发送过来的数据,且没有被wsgi进行解析
- 一般我们都会使用 request.body 获取 contentType=application/json 发送过来的数据,因为 wsgi 只能解析 contentType=application/x-www-form-urlencoded 发送过来的数据,然后放到 request.POST 中,所以 request.POST 无法获取 contentType=application/json 发送过来的数据,只能通过 request.body 获取 contentType=application/json 发送过来的数据,然后自行解析这些数据
- request.body -> 只作用于有请求体的请求,因为request.body是从请求体中获取元数据的,且GET请求中没有请求体,所以在GET请求中request.body是获取不到任何元数据的
- request.body -> 返回值: bytes类型的元数据
def views_fn(request):
if request.method == 'POST':
body_data = request.body # 前端发送过来的数据,且没有被wsgi进行解析
print(body_data) # b'username=Kevin&age=23' -> 当 contentType 为 application/x-www-form-urlencoded 所接受到的数据结构
# b'{"username":"Kevin", "age":18}' -> 当 contentType 为 application/json 所接受到的数据结构
return render(request, 'login.html')
- 获取 contentType=application/json 发送过来的数据,并且对数据进行解析
# views.py
import json
def views_fn(request):
if request.method == 'POST':
bytes_data = request.body # b'{"username":"Kevin","age":18}'
json_data = bytes_data.decode('utf-8') # {"username":"Kevin","age":18}
data = json.loads(json_data) # {'age': 18, 'username': 'Kevin'}
return render(request, 'login.html')
# login.html
$.ajax({
url: '/views_fn/',
type: 'POST',
contentType: 'application/json',
data: JSON.stringify({username: 'Kevin', age: 18}),
success:function (res) {
console.log(res)
}
})
7. request.GET -> 获取 GET 请求的数据
- 注意:所有的请求方式都必须大写
- 通常我们访问一个网址就是使用了 GET 请求
- 获取 GET 请求的数据 -> request.GET
- request.GET -> 返回值: <QueryDict: {'sid': ['15']}>,如果没有值会返回一个空字典:<QueryDict: {}> -> 类似于一个字典
- 注意: 从 request.GET 中获取到的值都是字符串类型的
def views_fn(request):
# 获取所有 GET 请求的数据
get_all_data = request.GET
print(get_all_data) # <QueryDict: {'sid': ['15']}>,如果没有值会返回一个空字典:<QueryDict: {}>
# 使用 .get() 方法获取 GET 请求中指定的数据,防止没有该值而报错,因为 request.GET 的返回值是字典,所以可以使用 .get() 方法,如果不懂可以看会字典中的 .get() 方法
get_data = request.GET.get('sid')
print(get_data) # 15
return render(request, 'login.html')
8. request.POST -> 获取 POST 请求的数据
- 注意:所有的请求方式都必须大写
- 获取 POST 请求的数据 -> request.POST
- request.POST 只能获取 contentType=application/x-www-form-urlencoded 发送过来的数据,不能获取 contentType=application/json 发送过来的数据,因为 wsgi 只能解析 contentType=application/x-www-form-urlencoded 发送过来的数据,然后放到 request.POST 中,所以 request.POST 无法获取 contentType=application/json 发送过来的数据,只能通过 request.body 获取 contentType=application/json 发送过来的数据,然后自行解析这些数据
- request.POST 什么时候有值:
- 以 application/x-www-form-urlencoded 编码格式发送过来的数据,那么 request.POST 中是有值的
- 以 application/json 编码格式发送过来的数据,那么 request.POST 中是没有值的,只能在 request.body 中获取发送过来的数据自行解析
- request.POST -> 返回值: <QueryDict: {'username': ['Kevin'], 'password': ['123']}>,如果没有值会返回一个空字典:<QueryDict: {}> -> 类似于一个字典
- 注意: 从 request.POST 中获取到的值都是字符串类型的
def views_fn(request):
# 获取所有 POST 请求的数据
post_all_data = request.POST
print(post_all_data) # <QueryDict: {'username': ['Kevin'], 'password': ['123']}>,如果没有值会返回一个空字典:<QueryDict: {}>
# 使用 .get() 方法获取 POST 请求中指定的数据,防止没有该值而报错,因为 request.POST 的返回值是字典,所以可以使用 .get() 方法,如果不懂可以看会字典中的 .get() 方法
username = request.POST.get('username')
password = request.POST.get('password')
print(username, password) # Kevin 123
return render(request, 'login2.html')
9. 获取 GET/POST 中实际数据的三种方法
- request.POST['xxx'] -> 不推荐使用
- 和获取字典中的值是一样的
- 如果没有该值就会报错
# GET/POST 用法都是一样的,这里就使用 POST 举例
def views_fn(request):
post_all_data = request.POST
print(post_all_data) # <QueryDict: {'username': ['Kevin'], 'password': ['123']}>,如果没有值会返回一个空字典:<QueryDict: {}>
username = request.POST['username'] # Kevin
password = request.POST['password'] # 123
return render(request, 'login2.html')
- .get('xxx')
- 获取key名为xxx,value为列表中最后一个值(因为value值都是以列表的形式存放的)
- 如果没有该值不会报错,则会返回一个 None
# GET/POST 用法都是一样的,这里就使用 POST 举例
def views_fn(request):
post_all_data = request.POST
print(post_all_data) # <QueryDict: {'username': ['Kevin'], 'password': ['123']}>,如果没有值会返回一个空字典:<QueryDict: {}>
username = request.POST.get('username') # Kevin
password = request.POST.get('password') # 123
xxx = request.POST.get('xxx') # None
return render(request, 'login2.html')
- .getlist('xxx')
- 获取key名为xxx的值,返回值: 列表(因为value值都是以列表的形式存放的)
- 如果没有该值不会报错,则会返回一个 [] 空列表
- 用处: 有的时候我们要获取POST过来多选框的值(值会有多个),如果使用 .get() 方法获取,只能获取到列表中最后一个值,所有只能使用 .getlist() 方法获取POST过来多选框所有的值
def views_fn(request):
post_all_data = request.POST
print(post_all_data) # <QueryDict: {'teacher_id': ['2'], 'teacher_name': ['Eva_J'], 'class_name': ['1', '2', '4']}>,如果没有值会返回一个空字典:<QueryDict: {}>
teacher_id = request.POST.get('teacher_id') # 2
teacher_name = request.POST.get('teacher_name') # Eva_J
class_name = request.POST.get('class_name') # 4
class_name = request.POST.getlist('class_name') # ['1', '2', '4']
return render(request, 'teacher.html')
10.request.FILES.get('file_name') -> 获取上传的文件
- 详细请查看 Django 文件上传 的章节
- request.FILES.get('file_name')
def upload_file(request):
if request.method == 'POST':
file_obj = request.FILES.get('img_file') # 获取上传文件
return render(request, 'upload_file.html')
其他
1. mark_safe -> 不对html标签进行转义
- mark_safe
# views.py
from django.utils.safestring import mark_safe # 不对html标签进行转义
def index(request):
a = mark_safe('<a href="https://www.baidu.com">百度</a>')
return render(request, 'index.html', {'a': a})
# index.html
{{ a }}
2.request.GET.urlencode() -> 将 request.GET (即: 字典)转化成 encode 编码格式的字符串
- request.GET.urlencode()
- 只作用于GET的请求参数
- 和Python中的 urllib 库中 urlencode 功能是一样的
# 访问的网址
http://127.0.0.1:8000/index/?a=1&b=2&c=3
def index(request):
encode_str = request.GET.urlencode()
print(encode_str) # c=3&b=2&a=1
print(request.GET) # <QueryDict: {'c': ['3'], 'b': ['2'], 'a': ['1']}>
return render(request, 'index.html')
例子
5. 登录例子
- 将视图函数直接写在了 urls.py 文件里

# urls.py
from django.conf.urls import url
from django.contrib import admin
from django.shortcuts import HttpResponse, render, redirect
def login(request):
error_msg = ''
if request.method == 'POST':
email = request.POST.get('email')
password = request.POST.get('password')
if email == '123@qq.com' and password == '123':
return redirect('http://www.baidu.com')
else:
error_msg = '登录失败'
return render(request, 'login.html', {'error_msg': error_msg})
def login2(request):
if request.method == 'POST':
username = request.POST.get('username')
password = request.POST.get('password')
if username == 'Kevin' and password == '123':
ret = '登录成功'
else:
ret = '登录失败'
return HttpResponse(ret)
return render(request, 'login2.html')
urlpatterns = [
url(r'^admin/', admin.site.urls),
url(r'^login/', login),
url(r'^login2/', login2)
]
- 将视图函数写在了单独的 views.py 文件里,然后通过相对导入,导入到 urls.py 文件里

# views.py
from django.shortcuts import HttpResponse, render, redirect
def login(request):
error_msg = ''
if request.method == 'POST':
email = request.POST.get('email')
password = request.POST.get('password')
if email == '123@qq.com' and password == '123':
return redirect('http://www.baidu.com')
else:
error_msg = '登录失败'
return render(request, 'login.html', {'error_msg': error_msg})
def login2(request):
if request.method == 'POST':
username = request.POST.get('username')
password = request.POST.get('password')
if username == 'Kevin' and password == '123':
ret = '登录成功'
else:
ret = '登录失败'
return HttpResponse(ret)
return render(request, 'login2.html')
# urls.py
from django.conf.urls import url
from django.contrib import admin
from .views import *
urlpatterns = [
url(r'^admin/', admin.site.urls),
url(r'^login/', login),
url(r'^login2/', login2)
]